Tag Archives: hostinger backend review

The Best Hosting Provider: Why Hostinger Tops the List

Choosing the right hosting provider is crucial for the success of your website. With numerous options available in the market, it can be overwhelming to find the best one that meets your needs. In this article, we will explore why Hostinger stands out as one of the top hosting providers and why it should be at the top of your list when considering hosting options for your website.

  1. Unbeatable Performance and Reliability:

Hostinger is renowned for its exceptional performance and reliability. With state-of-the-art data centers strategically located worldwide, they offer fast loading times and minimal downtime. Their servers are optimized for speed, ensuring a smooth browsing experience for your website visitors.

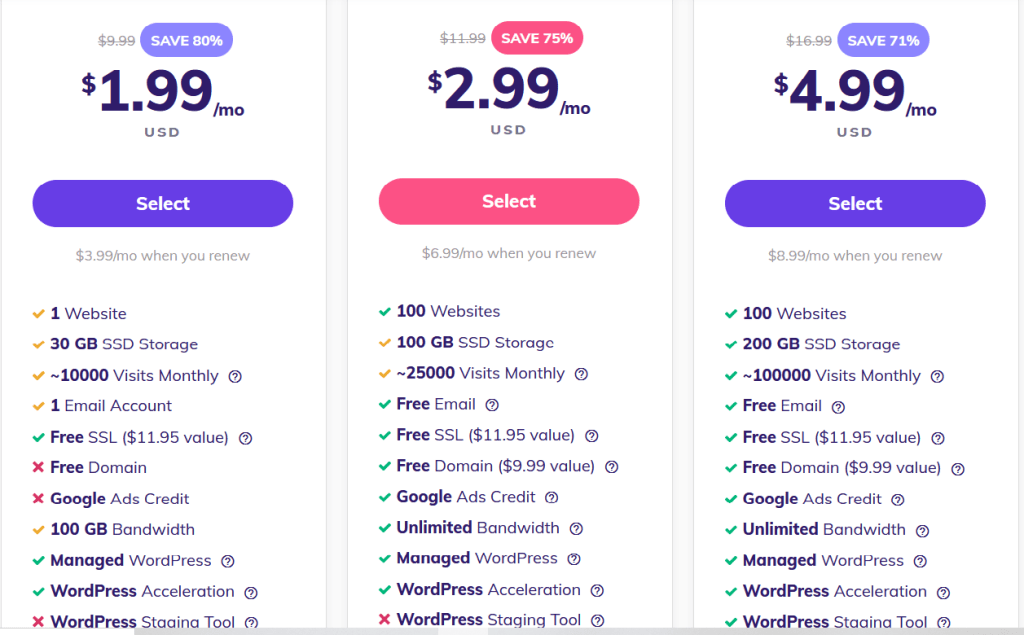
  1. Affordable Pricing with No Compromises:

One of the standout features of Hostinger is its affordability. They offer hosting plans at incredibly competitive prices without compromising on quality or features. Whether you’re a beginner on a tight budget or a seasoned professional, Hostinger provides hosting plans tailored to various needs, making it accessible to businesses of all sizes.

  1. User-Friendly Interface and Tools:

Hostinger provides an intuitive and user-friendly interface, making it easy for beginners to navigate and manage their hosting account. Their control panel is packed with powerful tools and features that allow you to install applications, manage domains, configure email accounts, and monitor website performance effortlessly.

  1. Robust Security Measures:

Security is a top priority for Hostinger. They employ advanced security protocols and implement proactive measures to protect your website from threats. Features such as SSL certificates, DDoS protection, and malware scanning help safeguard your website and customer data, providing peace of mind.

  1. Excellent Customer Support:

Hostinger offers exceptional customer support to assist you whenever you need assistance. Their knowledgeable support team is available 24/7 through live chat and ticket-based systems. Whether you have technical queries or need guidance, Hostinger’s friendly support team is there to help you promptly.

  1. Flexible Scalability:

As your website grows, you’ll need a hosting provider that can scale with your needs. Hostinger offers flexible scalability options, allowing you to upgrade or downgrade your hosting plan effortlessly as your website traffic and requirements change. This scalability ensures that your website remains optimized and performs well at all times.

  1. Feature-Rich Hosting Packages:

Hostinger offers a wide range of features and tools to enhance your hosting experience. From a simple website builder to one-click application installations, advanced caching mechanisms, and automated backups, Hostinger provides everything you need to create, manage, and optimize your website.

Conclusion:

When it comes to choosing the best hosting provider, Hostinger consistently ranks among the top choices. With its unbeatable performance, affordable pricing, user-friendly interface, robust security measures, excellent customer support, flexible scalability, and feature-rich hosting packages, Hostinger delivers an exceptional hosting experience. Consider Hostinger as your preferred hosting provider and unlock the full potential of your website with their reliable and affordable hosting solutions.

Affiliate Link HOSTINGER

DIY Guide: How to Migrate Your WordPress Website to Hostinger

Migrating your WordPress website to a new hosting provider can seem like a daunting task, but with the right knowledge and guidance, you can successfully accomplish it on your own. In this step-by-step guide, we will walk you through the process of migrating your WordPress website to Hostinger, a popular hosting provider known for its performance and affordability. By following these instructions, you’ll be able to seamlessly transfer your website and ensure a smooth transition to your new hosting environment.

  1. Backup Your WordPress Website:

Before you begin the migration process, it’s crucial to create a backup of your WordPress website. Use a reliable backup plugin, such as UpdraftPlus or Duplicator, to generate a complete backup of your website files, database, themes, and plugins. Store the backup files in a secure location, either on your local computer or a cloud storage service.

  1. Set Up Your Hosting Account with Hostinger:

If you haven’t already done so, sign up for a hosting account with Hostinger. Choose a plan that suits your needs and budget. Once your account is set up, you’ll receive an email with your hosting account details, including the nameservers.

  1. Export Your WordPress Database:

Access your current hosting account’s control panel (usually cPanel) and navigate to the phpMyAdmin tool. Select your WordPress website’s database from the left-hand side menu. Click on the “Export” tab, choose the “Quick” export method, and select the SQL format. Click “Go” to download the SQL file containing your database.

  1. Upload Your Website Files:

Using an FTP client, connect to your current hosting account and navigate to the directory where your WordPress website is located (usually public_html). Download all the files and folders to your local computer.

  1. Import Your Database to Hostinger:

Access your Hostinger account’s control panel and locate the phpMyAdmin tool. Create a new database for your WordPress website and import the SQL file you exported earlier. Confirm the successful import of the database.

  1. Modify the wp-config.php File:

Using an FTP client, connect to your Hostinger hosting account and locate the root directory where your WordPress website will reside. Open the wp-config.php file for editing and update the database connection details to match your new Hostinger database settings.

  1. Upload Your Website Files to Hostinger:

Using the FTP client, navigate to the root directory of your Hostinger hosting account. Upload all the website files and folders that you downloaded earlier from your local computer.

  1. Update DNS and Nameservers:

To direct your domain to your new Hostinger hosting account, you’ll need to update the DNS settings or nameservers. Access your domain registrar’s control panel and replace the existing nameservers with the ones provided by Hostinger. DNS propagation may take up to 24-48 hours.

  1. Test and Verify Your Website:

Once the DNS propagation is complete, visit your domain in a web browser to ensure that your website is working correctly on Hostinger. Check that all pages, images, and functionality are functioning as expected.

  1. Update Permalinks and Plugins:

Log in to your WordPress dashboard on Hostinger and navigate to the “Settings” menu. Click on “Permalinks” and choose your desired permalink structure. Update any plugins or themes that require new license keys or settings specific to the Hostinger environment.

Conclusion:

By following these step-by-step instructions, you can successfully migrate your WordPress website to Hostinger without the need for professional assistance. Remember to always back up your website before initiating any changes, and carefully follow each step to ensure a smooth and seamless migration. Enjoy the improved performance and features that Hostinger offers, and continue to create and grow your

Use Affiliate Link Hostinger.